Since late 2019, Firefox has been on a rapid release cycle which means that a new version of the standard (stable) build of the browser is released approximately every four weeks. Consequently, the browser needs to be updated at least every month.
With the default settings, Firefox is set to automatically download the updates and install them.
These updates are typically installed silently in the background provided one opted to install the maintenance service when installing Firefox. Otherwise, they are configured to install when Firefox is not running.
This behaviour can be slightly adjusted by going to the Firefox Updates section that can be found in the General settings inside Firefox Preferences. Only two options are provided there: either to automatically install the updates, which is the default (and recommended) setting, or to check for updates and have you chose to install them.
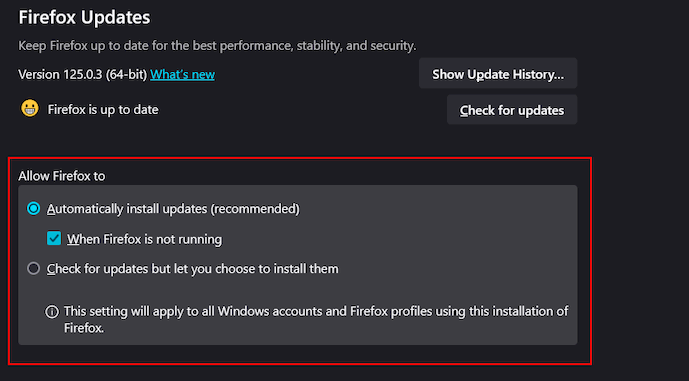
Choosing the second option allows one to decide when to download and install new updates. This is done through a pop-up notification that alerts users that a new version is available. Additionally, the notification is pinned just above the menu button and cannot be dismissed until one updates Firefox.
This behaviour is bound to be annoying to some users, especially for those that prefer to manually download and install new versions of Firefox. While there’s no option to turn off this notification, there’s a workaround that disables it for good.
The workaround involves disabling Firefox’s automatic updates which in turn disables the update notification. This method however carries with it the caveat that Firefox will not be able to check for new updates nor download and install them.
Nevertheless, the browser can always be updated manually by downloading and installing a newer version of Firefox on top of the existing one. Running the offline Firefox installer (setup) in this case will automatically detect the existing Firefox version and upgrade it to the newer version while keeping the browser’s data and settings.
How to Disable Automatic Updates
Firefox automatic updates can be disabled in a couple ways, but all essentially use the same principle: firefox policies.
The policy we are interested in is called DisableAppUpdate. The easiest way to enable this policy on supported operating systems including Firefox for Windows, Linux and macOS is to use an Enterprise Policy JSON file that goes inside the browser’s installation folder.
Follow the steps below to enable it (or watch my tutorial on YouTube):
- Open a plain text editor and paste the following code in it:
{
"policies": {
"DisableAppUpdate": true
}
}- Save the file as a json file named policies.json
- The above policy JSON file has to be saved in the installation directory of Firefox in a folder called Distribution. This folder is by default not included, and so you’ll have to create it manually. The default installation directories on the Windows, Linux and macOS are as follows:
- Windows:
C:\Program Files\Mozilla Firefox\distributionor; C:\Program Files\Mozilla Firefox (x86)\distributionif you’re running a 32-bit Firefox installation on a 64-bit Windows.
- Linux:
firefox/distributionwhere firefox is the installation directory for Firefox in the Linux distribution you’re using; you can also specify a system-wide policy by saving the file inside/etc/firefox/policies
- macOS:
- Before you can install the file on your Mac, you’ll need to remove the quarantine set by macOS which breaks an app should its installation be modified. To do that, open the terminal and navigate to the applications’ directory by running
cd /Applications. Next, run the command:xattr -r -d com.apple.quarantine Firefox.app - After doing that, save the policies.json file inside:
/Applications/Firefox.app/Contents/Resources/distribution. You’ll have to make the directories if they’re not present.
- Before you can install the file on your Mac, you’ll need to remove the quarantine set by macOS which breaks an app should its installation be modified. To do that, open the terminal and navigate to the applications’ directory by running
- Windows:
Note: The distribution folder is overwritten whenever you upgrade to a new version. As such, you’ll need to create it after every upgrade to keep the policy active. To do this, simply make a backup of the distribution folder in a different location which you can then be copying into the installation folder after each upgrade.
On the other hand, you can also enable the policy using the following more advanced methods which do not require installation after each new update:
