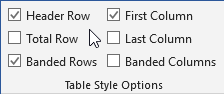
Microsoft Word allows us to create Header Rows for our tables with a click of the button. This option can be found in the Design tab that is visible once a table is selected.
A header row is sufficient for most tables, but what if you need its column equivalent, namely a Header Column? A good example is when the data in all the columns is of the same type, and you want to highlight this fact with a vertical title on the first column.
Well, there’s no option for that, however that doesn’t mean you can’t manually make one for yourself. Here’s how to go about it.
Make a Header Column Manually
- Insert a Table as you normally would. Add one extra column for the header.
- Select the table and go to the Design tab. Select a Table Style if you need to use one.
- Enable the Header Row if it’s not already enabled and enter title(s).
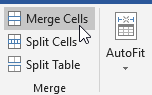
- Go to the Layout tab, select all the cells in the first column and click on Merge Cells.
- Resize the now merged column so that it’s almost the same size as the header row.
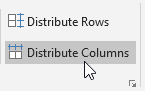
- Distribute evenly the rest of the remaining columns using the Distribute Columns option in the Layout tab.
- Put the cursor inside the merged column, then change the text direction to Vertical in the Layout tab. Also align the text to Vertical Center so that the text lies in the middle of the column
 .
. - Enter your text inside the column and there you have it – a custom-made Header Column.
